Projects so far

Saturday 30 April 2011

17th Project completed - A Macrame hanging tidy!

Well here it is - Number 17. I am desperately trying to tidy up my work room at the moment so I thought I would try to make a few storage items over the next few weeks starting with this one. Based on the Macrame plant hangers so popular in the 70's it is a really handy hanging tidy which I can fill with all the little bits and pieces I have lying around on my desk. You will find instructions for all the knots HERE - A fantastic site for beginners in Macrame.


Instructions for making it below!

Materials used
  • Bailer Twine, (If you don't have any of this you could use string or raffia)
  • 3 x Polystyrene Cups
  • A ring from an old keyring

Instructions:

1. The first thing to do is to prepare your cups. Decide how tall you want them to be and cut around the cup to shorten them.


2. Then give them a couple of coats of Acrylic paint in colours to match your twine.


3. Now attach your 3 lengths of twine - folded in half, to the ring and hang it up somewhere so you can work on it easily

IMG00621-20110430-2026.jpg image by julytextiles

4.  For the top section: Work 4 Flat knots using two of the lengths of twine over a core of the other four. Then separate into colours. Work 15 half hitches in each colour to make spirals.


5. To make the pot holder section: Separate out the stands. Tie two knots halfway down your pot to the next colour. i.e blue to pink, pink to orange, orange to blue as above. Then gather together all the stands at the bottom of your pot and work 4 flat knots as in step 4. Repeat steps 4-5 for each pot.


6. To finish: Separate the strands into 2 sets and plait. Knot the ends and fray out edges. Fill with stuff!

Sunday 24 April 2011

17th Project announcement

Hello, I have spent all day working up at Hollycombe Steam Collection. It has been rather warm to say the least! Not the ideal weather for playing with steam engines, but hey why not.

Our horses are also kept up there, so we have been able to keep a close eye on them in this weather. Whilst I was there I found this in the shed where we keep our feed etc. I liked the colours and thought I could make something with it rather than throwing it all away!


A pile of scrap bailer twine.

Saturday 23 April 2011

16th project completed - a colourful garden mobile

Hello again! This week I have been trying to sort out my garden, not an easy job with two young dogs intent on destroying it at every opportunity! I wondered if the aluminium drink cans I rescued from the rubbish could be used to brighten the garden up. They are, of course waterproof and durable. So I came up with this........


A colourful garden mobile to hang from my shed!


Materials required

  • An aluminium drinks can
  • Fishing wire or beading nylon
  • A few beads from a broken necklace
  • Needle
  • Sharp small scissors

Instructions
1. Cut the top and bottom off your drinks can, then cut down the can and open out to create a flat sheet of metal.

2. Draw 3 circles of differing sizes onto the sheet of aluminium and carefully cut out (the edges will be very sharp so take care).

3.Now cut out the middle of each circle. Save one of the removed circles to create a 'twiddly' bit for the bottom of your mobile. Pierce holes at the top and bottom of each shape with a needle.


4. String together with the fishing wire and beads to create a hanging mobile and add a hanging loop at the top.


5. Hang up and enjoy!

And there you have it, a colourful mobile to adorn your garden shed which will reflect the light whilst moving in the wind!

Sunday 17 April 2011

16th Project announcement

Wow what a busy day!
I spent the morning retrieving my classic Morris Minor car from the garage she has been stored in for 5 years (she looked as though it had been more like 20!).I am aiming to have her back on the road by the end of June.

After an afternoon cleaning, she is now almost shiny. Unfortunately she has seized brakes and won't start but hopefully that won't take long to sort out. So I guess I have a busy few weeks ahead of me!

Anyway back to the task at hand, this week's project announcement. This week I am going to try and think of something to make with.........


Old soft drink cans!

Saturday 16 April 2011

15th Project completed - a springtime bangle!


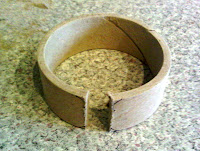
Hi, this weeks project was really fun and quite quick once I had worked it all out. I have made a bangle from the industrial cardboard tube using some leaflets which arrived through the post from local garden centres etc.


Materials used:

  • Industrial cardboard tube
  • Magazines / leaflets
  • PVA Glue
  • Acrylic paints
  • Acrylic varnish
  • Paint brush
  • Hacksaw
  • Sharp scissors


Instructions to make the bangle blank


1. Mark your tube in 3cm segments and cut to size with a hacksaw.


 2. Sand to smooth edges, and then remove a 1cm section as above. Round off the edges with a pair of sharp scissors and re sand. You now have a blank bangle to decorate as you wish.

Once you have the bangle blanks made you could decorate them anyway you like. Paint them, cover them in fabric or paper or just stain or varnish them as you please!


How I decorated my bangle


1. I used torn pieces of paper taken from the leaflets to make a background, these were stuck to the bangle blank with PVA glue to look like a mosaic.


2. I applied some motifs onto the background which were carefully cut from the leaflets and glued on, then left the whole thing to dry. 


3. I then painted the inside and edges carefully with acrylic paint to match the outside and painted a very light wash over the whole thing to blend it all together. Then I left it to dry completely .


4. To finish, I added a couple of coats of gloss acrylic varnish to add depth and shine.

There we have it, a bangle to enjoy wearing this spring.

Join me tomorrow evening for the next project announcement!


Sunday 10 April 2011

15th project announcement

Well I have had a very busy day! Those of you who know me personally will know that my other hobby is steam engines and I have spent all day at Hollycombe Steam Collection as we opened today. First I helped my other half complete the electrics and lights on the collection's set of Galloping Horses, then helped him get the train ready for him to drive this afternoon, and then spent the afternoon cleaning out my Edwardian living wagon (old caravan) ready for us to use as a base over the long Easter weekend.

So as you can imagine I am just about ready to drop! However before I do that I had better let you know what rubbish I am going to play with this week........


An industrial cardboard tube!

We often have these at home, my rolls of embroidery stabiliser come on them and I never know what to do with the empty ones, they usually just go out for recycling but at nearly 31/2" in diameter there must be a better use for them!

Saturday 9 April 2011

14th project completed! A small Easter basket

Well I promised something with and Easter theme this week, and here it is. A small easter basket, ideal for giving as a gift, full of mini eggs!


Materials used:
  • Scraps of thread etc. left over from previous projects
  • A couple of scraps of left over heavy water soluble embroidery stabiliser approx. 7" square.
  • Thread
  • Sewing machine
  • Warm water
  • Gold netting
  • Mini eggs
  • Small drinking glass
  • Cling film
Instructions


1. Randomly lay your scraps of thread on top of one layer of water soluble stabiliser. Now add a top layer of stabliser and pin to secure.


2. Stitch vertical lines across your fabric about 1/4" apart then turn your fabric 90 degrees and stitch lines again.


3. Once the fabric has been completely covered in the stitched grid, place in a bowl of warm water and agitate carefully to remove most of the stabiliser. You need to leave a little to help with the moulding in the next step.


4. Cover a small rounded drinking glass or similar in cling film. Turn it upside down, then carefully mould your fabric around it as shown in the picture above.


5. Leave to dry.


6. Once dry remove from the mould and carefully trim any loose ends etc.. I did not tidy my edges too much as I liked the as they were. You can of course, neaten up the edges as you please.


7. Place a small amount of gold netting or tissue paper in the bottom of the basket and fill with chocolate mini eggs, making sure that you try a few to make sure they are OK!

Monday 4 April 2011

Fame at last?


The local press were at the information evening held by the Bordon and Whitehill eco-town team on Wednesday March 23rd and I got onto the front page. There has been much micky taking by my friends but hopefully it will help to spread the word!

Sunday 3 April 2011

14th Project announcement


Hello again, I hope you all liked last weeks effort. I loved the colours and saved all the left over bits of of thread etc. as I couldn't bear to throw them away! I have added them to the scraps I saved from the frayed edges bag I made a few weeks ago as I think they will work well together, so this week I will be doing something with these. I am also going to try and give the project an Easter theme.

Saturday 2 April 2011

13th Project completed - A Small Springtime Container

Well this one's a bit of a challenge, ideal for those of you addicted to hand stitch! This little spring time inspired pot was made from a few scraps of fabric, a herb pot and a lot of patience! It was made as a gift for mothers day.


Happy Mother's day Mum

Materials needed
  1. A small herb pot
  2. A few scraps of fabric
  3. Embroidery threads
  4. Embroidery hoop
  5. Needle
  6. Scissors
  7. Hacksaw or similar

Instructions


1. Using a junior hacksaw or similar, cut the top and bottom off your herb pot so you are left with three pieces. Discard the middle piece.


2. Draw around the top and bottom parts of your pot to make a pattern to cover your pot plus lining. You will need 4 circles 1 each for the bottom, top and 2 for lining. You will also need 2 wider strips and two narrower strips.


3. Put your fabric into an embroidery hoop and proceed to cover one of the wider fabric bands (which will cover the bottom section) in French knots. I did them in drifts of different colours. I then added some little butterflies in lazy daisy and straight stitch. Cover the narrower lid band in matching knots.


4. Now embroider the top - first make two layers of lazy daisy stitch then fill with French knots.


5. Cut out the pieces very carefully and stitch together the lid top and band tight around the lid. Then taking the main band and a plain circle of felt stitch them together around the pot covering it completely. Now assemble the lining and slip stitch together.


And there you have it, a lovely little spring time pot. Well worth the effort